









How to Remove Dust from Room Heater: Safe and Easy Step-by-Step Guide
Every winter, the same thing happens: you switch on your room heater for the first time and a stale, burning smell fills the room. That smell is dust, lint and pet hair that settled on the heater during months of storage and now cooks on the hot element. Dust is more than an annoyance. It cuts heating performance, strains the fan, raises your electricity use and can become a fire hazard.
This guide explains exactly how to remove dust from a room heater safely, which tools work best, how to handle each heater type, and how to stop dust from coming back so quickly.
Why Dust Collects on Room Heaters
Heaters, especially fan and ceramic models, pull a constant stream of room air through narrow vents. Everything floating in that air, including skin flakes, fabric fibers, pet hair and outdoor dust, gets trapped at the intake grille and inside the housing. Warm surfaces and static electricity make dust stick even more. Heaters that sit on carpets, near beds or in homes with pets collect dust fastest.
Signs Your Heater Needs Dust Removal
- A burning or musty smell when switched on
- Visible dust or lint on the grille and vents
- Weak warm air or slow room heating
- Louder fan noise or rattling
- The heater switching off by itself (overheat protection)
- Dust blown out into the room when the fan runs
Safety First
- Work on a flat, dry surface with good light.
- Wear a dust mask if you have allergies, since old dust can irritate the nose and lungs.
- Read your manual before removing any panel or grille.
- Never open sealed parts, such as the oil reservoir in an oil-filled radiator.
Tools You Need
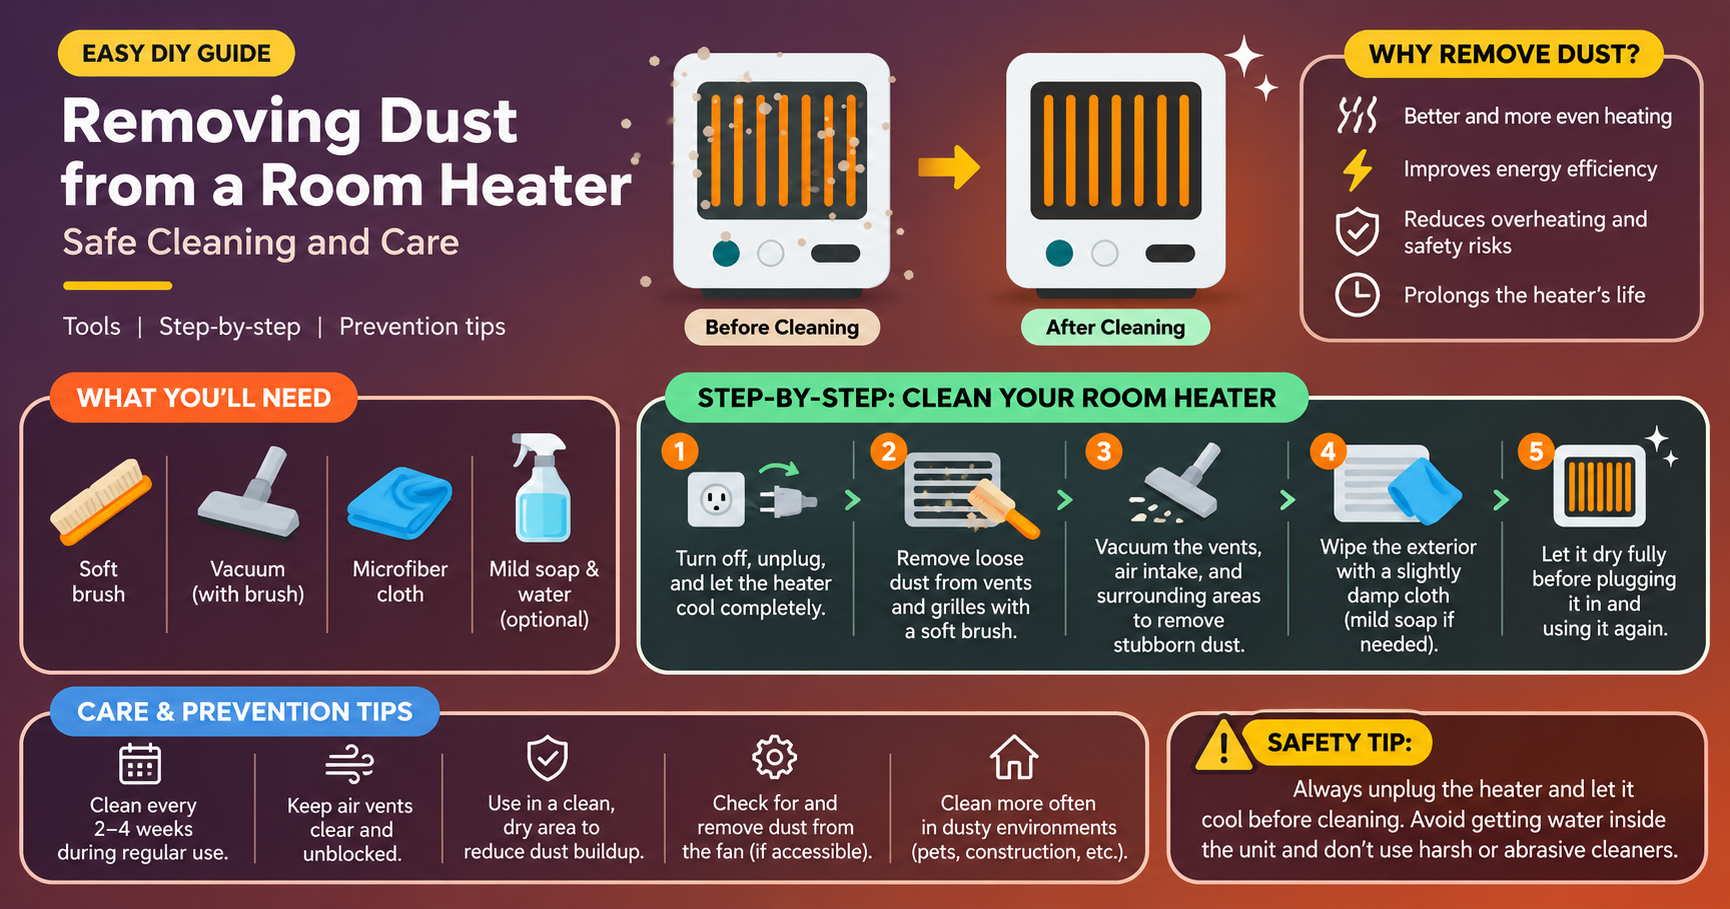
How to Remove Dust from a Room Heater: 5 Simple Steps
Step 1: Unplug and Cool the Heater
Disconnect the plug and wait until every part is cool to the touch. Move the heater outdoors, to a balcony or to a well-ventilated room so dust does not spread around your living space.
Step 2: Loosen Dust with a Soft Brush
Gently brush the front grille, side vents and the visible heating element from top to bottom. A clean paintbrush or a soft makeup brush reaches between slats without scratching the finish. Loosening dust first makes vacuuming far more effective.
Step 3: Vacuum the Vents and Grilles
Attach the brush or crevice tool and vacuum the front grille, rear air intake and any visible gaps. Use low suction and move slowly. Vacuuming is better than blowing, because it removes the dust instead of just moving it around.
Step 4: Use Compressed Air for Deep Dust (Optional)
For dust trapped behind the fan or deep in the housing, use a compressed air can in short bursts, holding it a few inches from the surface and always at an angle. Do this outdoors or follow it with another round of vacuuming. Never spin the fan blades fast with compressed air, as this can damage the motor.
Step 5: Wipe, Dry and Test
Wipe the body with a slightly damp microfiber cloth, then dry it with a clean cloth. Use cotton swabs for the control panel and tight corners. Let the heater rest 30 minutes, plug it in and run it on low for 10 minutes. A faint smell in the first few minutes is normal.
Dust Removal Methods by Heater Type
| Heater Type | Where Dust Collects | Best Method |
|---|---|---|
| Fan heater | Intake grille, fan blades, element | Brush, vacuum, then gentle compressed air |
| Ceramic heater | Front grille and rear filter | Vacuum grille, wash or wipe the filter if removable |
| Oil-filled radiator | Fins and top of the unit | Thin brush or vacuum between fins, then damp cloth |
| Halogen or quartz | Reflector and guard | Dry soft cloth only, never touch the tube with bare fingers |
| Convection panel | Top and bottom vents | Vacuum vents and wipe the panel |
| Infrared heater | Front panel | Dry microfiber cloth, then a barely damp wipe |
How to Remove Burnt Dust Smell
If a burning smell remains after cleaning, dust may still be stuck on the element. Switch the heater off, let it cool and clean again with extra attention to the heating area. Then run it on low in a ventilated room for 15 minutes. If the smell resembles burning plastic or you see smoke, stop using it and have it checked by a technician.
Mistakes to Avoid
- Using water directly: Moisture inside vents can cause short circuits.
- Blowing with your mouth or a hair dryer: This spreads dust and may push it deeper inside.
- Using sharp tools: Pins or knives can damage the element or wiring.
- Cleaning while warm: Risks burns and shock.
- Ignoring the manual: Some models have sealed or warranty-protected parts.
How to Prevent Dust Buildup
Dust returns quickly if the room itself is dusty. Vacuum floors regularly, wash bedding often and keep the heater on a hard, flat surface rather than a rug. Heaters with a washable filter need the filter rinsed monthly and dried completely before reinsertion.
How Often Should You Remove Dust?
| Situation | Recommended Frequency |
|---|---|
| Regular use, no pets | Wipe weekly, vacuum vents monthly |
| Homes with pets or heavy dust | Vacuum vents every 2 weeks |
| Before first winter use | Full deep clean |
| Before storage | Full clean and dry |
Features That Make a Heater Easier to Keep Dust-Free
- Removable or washable air filter
- Smooth front grille with wide slots
- Tip-over and overheat protection
- Compact, easy-to-handle design
- Clear manual with cleaning instructions
Frequently Asked Questions
Can I use a vacuum cleaner directly on a heater?
Yes, once it is unplugged and cool. Use a brush or crevice attachment on low suction and avoid forcing the nozzle into the heating element.
Is it safe to use a hair dryer to blow out dust?
It is not recommended. It spreads dust through the room and may push it deeper into the heater.
Why does my heater smell like burning after I clean it?
Leftover dust is likely burning off the element. Run it on low in a ventilated room. If it persists, clean again or have it inspected.
How do I clean dust from between oil radiator fins?
Use a thin soft brush, a vacuum crevice tool or a long microfiber cloth folded over a ruler, then wipe with a lightly damp cloth.
Can dust in a heater cause a fire?
A heavy dust buildup near hot components can overheat or ignite, which is why regular removal is important.
Final Thoughts
Knowing how to remove dust from a room heater takes only a few minutes of effort and a handful of household tools. Unplug it, brush, vacuum, wipe and dry, then repeat on a regular schedule. A dust-free heater warms faster, runs quieter, uses less power, smells fresh and keeps your home safer all winter.
This article is for general information. Always follow your heater manufacturer’s instructions for cleaning and safe use.